Adopting a monorepo directly corresponds to huge investments in the CI infrastructure for an organization. This is simply because there is no open-source solution which works with monorepos out-of-the-box.
Conventionally, every repository has a single pipeline associated with it. This is extremely inflexible for monorepos.
I’m documenting my work on developing a CI framework in Jenkins which allowed us to have a pipeline for each package (a directory containing a BUILD file) in the monorepo. The framework would detect changes in your PR/Commits and minimally trigger the pipelines associated with the affected packages.
The other major aspect I talk about is performance, and the efforts of bringing down the time to run the first piece of useful code to < 2 minutes for a 40 GB monorepo at qure.ai.
 Onboarding Bazel to your engineering workflow is not an easy task. Although google open-sourced their mystical build tool, they never open-sourced the whole tooling around it. Without that tooling, Bazel can be a really big pain to work with.
Standard open-source tools historically were never meant to be used in the monorepo context.
The problems:
gitdownloads the whole repository, it does not matter if you do sparse checkouts, you still download the whole thing.- Standard CI solutions offer you options to create infinite pipelines per repository, but conventionally, they have only been used in the one pipeline per repository context.
- IDE integration: Bazel python IDE integration is really hard to get right (there is no way to automatically do this with built-in rules satisfactorily). IDEs also have recently started providing support for monorepos.
- Intellisense (LSP and DAP integration) itself needs to support monorepos explicitly. The problem is in detecting your package boundaries and being able to provide different rules per package.
The CI problem
The only motivating factor to use monorepos is to put code in the same place, where you can track all changes together. In a multi-repo setup, to update a library L for application A, you would follow these steps:
- update the code in
L, get your PR merged - wait for
L’s pipeline to upload your new version to the registry (after tests have passed) - update the version in
Awith another PR
There might be longer chains of packages (A -> B -> L). In this case you need to update L everywhere
Monorepo short-circuits and fully parallelizes this manual procedure. Now you simply change L and A’s code at the same time
This parallelization brings true continuous integration. Every trackable piece of code is continuously tested
This is a very strong way of thinking about your CI. The problem now however, is that your CI is suddenly heavily burdened. The average load has significantly increased.
At qure.ai, our Jenkins setup was not ready for this spike
The first attempt
Almost everyone starts with a single pipeline for the whole repository and may do something equivalent to this in their CI
pipeline {
    checkout scm

    // test the universe
    sh "bazel test //..."

    // or you might want to do it manually
    sh """
        bazel test //services/A
        bazel test //libs/B
    """
}
You essentially test every testable package in a single root pipeline
At this point you would have several huge problems thrown at you
- git clone takes too long (I had a 40GB repository)
- Bazel takes too long to startup
- Its running all tests, the pipeline is taking hours for every small change
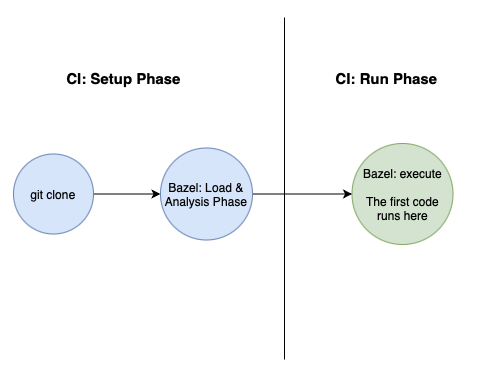
Your pipeline can be split into two phases, the setup phase and the run phase.
Arguably, the biggest gain here is in not running every test in the pipeline. We need to optimize the Run Phase first.
Performance: Optimizing the Run Phase
Currently we are running all tests in for every little change in our pipelines. The easiest answer to fixing this is with bazel’s in-built caching.
Strong caching capabilities are a major differentiator between Bazel and many of its simpler competitors (like make)
The easiest way to watch it in action is to run the same command multiple times, without changing anything
bazel test //services/A   # runs your tests, takes say 10 minutes
# run the command again without changing any code
bazel test //services/A   # cached: tests are not run, finishes in seconds
Bazel is able to cache your tests between multiple runs. This works because bazel keeps a persistent disk cache for every piece of work it schedules
There are two types of persistent caches that bazel uses:
- Repository Cache
- Action Cache
We are going to use this caching ability to skip all unchanged targets. Our pipeline script does not change at all right now, we do still explicitly ask Bazel to run everything.
We will improve our caching infrastructure so that bazel can implicitly skip unchanged targets.
Repository Cache
This is the location where bazel stores all external artifacts (whatever you downloaded using repository rules like http_archive).
By default, all bazel workspaces in a system share this cache. This cache can also only be stored on disk.
As such, you don’t need to do any special configuration for this cache
This does imply that you need permanent agents, the moment your agent is terminated, this cache is wiped out. As we’ll see later, we really do end up with stateful long living agents to maximize bazel speed
If you still need to use this cache for ephemeral agents and use AWS, check out my article on providing cache volumes to autoscaling groups
You can set a pre-configured location for the agent globally by putting this content in the global bazel configuration file: ~/.bazelrc
# ~/.bazelrc
# we put it in our jenkins home generally for permanent agents
common --repository_cache=/var/lib/jenkins/__internal_bazel/repository_cache
Action Cache
Every rule is a pure function. That is, given a rule definition and a set of inputs, the set of outputs will always be the same (no matter where, when and how many times you “run” the rule). This is the foundation behind bazel’s correctness. It’s a pre-requisite for hermeticity.
On hermeticity
Reference
Imagine you are running a script which uses awk.
Generally, we assume awk would exist in our environment. But do we know what version of awk we are using? Or if it really is present in the system?
Our simple script here cannot deterministically run on target systems.
 Fixing the
 awk problem is simple, ship awk with the script.
But how do we make sure awk installation itself does not depend on some system library?
For any program to be pure, all it’s dependencies also need to be pure, and all their dependencies need to be pure, and so on.
This is why, google builds everything using bazel, you really need to build the whole world using bazel if you need true reproducible and deterministic programs.
When we say that for a given set of inputs and an action, we really mean all the inputs.
Bazel works very hard to isolate your build steps from the system environment. If you do not specify some system library as input to your rule, it wont be visible to the action. This allows it to explicitly track all inputs.
A hermetic build system needs to track everything.
Anyways, back to caching. An action is the base unit of work in bazel. It’s the act of “running” a rule. You can imagine rules as functions while actions are invocations of those functions.
Examples of actions:
- Running your test.
- Calling
gccon your source code incc_binarytarget.
Since actions are hermetic, caching is trivially correct. There is no fear of your cache returning wrong entries.
By default, the action cache is stored on disk, at ${outputBase}/action (each workspace has its own output base, if you clone the same repository in multiple places, their outputBase would be different). This means that the action cache is not shared among different repository clones. This is bad for CI.
There are two ways you can configure the location of this action cache.
- It can be a remote server acting as cache. This is very useful to share cache between multiple agents (servers)
- Local file path (called disk cache)
Remote Cache
The simplest way to setup the remote HTTP server infrastructure is to use bazel-remote. Its a no-brainer to setup. Just create a compose file and put it in a server accessible to all your build agents. Make sure you use a server with high bandwidth here, the server should also be preferably accessible using a fast internal network.
Its important to share this cache as much as possible across your build agents wherever you are using remote caching
bazel-remote also provides automatic cache eviction, keeping your disk usage in check. This is one of the biggest advantage over using simpler solutions like nginx
Here’s the compose file
# we use the plain HTTP protocol
# take a look at the README of `bazel-remote` for configuring gRPC if you want
version: '3.6'

services:
  bazel-cache:
    container_name: bazel-remote-cache
    image: buchgr/bazel-remote-cache:latest
    restart: always
    ports:
      - 8080:8080
    # this size is in GB, the remote server takes care of disk cleanup
    command: --max_size=150
    volumes:
      - bazel-remote:/data

volumes:
  bazel-remote:
    external: true
As done before with repository_cache, configure this globally for all your agents by putting it in the global ~/.bazelrc file
# ~/.bazelrc

common --remote_cache=http://<internal-remote-server-ip>:8080

# if you want to use it specifically for test
test --remote_cache=http://<internal-remote-server-ip>:8080
Disk cache
This is pretty straightforward. It will allow pipelines running on the same server to access the same action cache
# ~/.bazelrc

common --disk_cache=/var/lib/jenkins/__internal_bazel/action_cache
Which cache should I use?
If you are just starting out, use remote_cache for all your needs.
The disk cache is useful when your bazel build commands involve huge files (like creating a large docker image). In these cases, the network can become a potential bottleneck. Using disk natively can give huge speedups
--disk_cache is not howver, garbage collected. There is no cache eviction. You will need to start cronjobs for this, its very common for disk cache to explode.
The other option is to simply start bazel-remote locally in the server, and configure using that cache using localhost (this is short-circuited by the OS, way faster than using a remote URL). This takes care of cache eviction. I ended up using this after the disk problems started becoming annoying
Results
At this point, bazel should start skipping all unchanged tests. This simple pipeline would now generally run the minimal tests
bazel test //...
Performance: Optimizing the Setup phase
Now that we are not running every target in our repository, let’s take a look at the setup phase.
The CI has to do some sort of preparation to start running user scripts. In an ideal world, this preparation should take 0 seconds.
Remember that the only work CI does is run a user’s script somewhere. Every second spent during setup is wasted time.
Two major performance bottlenecks right now are:
- git clone
- bazel startup time
Let’s first understand why bazel sometimes takes some time to actually run your actions after it is invoked. Bazel outputs some logs during this time
Extracting Bazel installation...
Starting local Bazel server (<>) and connecting to it...
INFO: Invocation ID: <>
Computing main repo mapping:
Computing main repo mapping:
Computing main repo mapping:
...
...
If Bazel is taking some time while Computing main repo mapping, it’s mostly stuck in the loading and analysis phases.
Analysis Cache
Every bazel build starts with the loading and analysis phases. During this time, bazel evaluates your Starlark files and creates a directed acyclic graph of actions to run.
The graph is then cached in the bazel server’s memory. This is called the analysis cache
Since bazel does not store its action graph in disk (or remotely), it makes it very difficult to come up with caching schemes.
Every separate clone of your repository instantiates a new bazel server. Each server has its own memory. The implication is that action cache can only be shared by bazel invocations on the same clone location.
conventionally, we git clone too much
We want to reach the last step as fast as possible, everything else is wasted time for the CI user. In the context of my monorepo (40 GB in size), this was approximately 8-10 minutes (with ALL persistent caches [git and bazel] configured)
The crux of the issue here is that we are doing
git clonein fresh locations. We are simply cloning too much.
Reducing clone times
To reuse pipeline clones, we need to specify where to clone the repository when your job runs. This can be done with ws function in Jenkins (you need to use the scripted pipeline).
It’s time to take the responsibility of cloning away from Jenkins, we own and customize it.
node("mybazelagent") {
    ws("bazel_wkspc_1") {
        stage("checkout") {
            checkout scm
        }
    }
}
The first clone will take time, but subsequent pipeline runs would do a git fetch + git checkout instead of a git clone. Monorepos work well with trunk-based development. Everyone is almost always caught up with main. This makes checkout extremely fast for common cases.
Parallel jobs races
The above solution does not work if you agent can run multiple jobs in parallel. Two parallel jobs will end up using the same cloned directory.
In Jenkins, the base resource which executes a job is called an executor. When configuring an agent, you also specify the maximum executors it can run in parallel. This allows you to configure the concurrency of a single agent.
Each job has access an environment variable, EXECUTOR_NUMBER. This is unique to every executor for an agent (assume that you can only have one agent per server)
Two parallel jobs in an agent would always have different
EXECUTOR_NUMBERvalues, we can therefore use this value to create a unique workspace name to use.
node("mybazelagent") {
    // adding EXECUTOR_NUMBER to the workspace name removes the parallel clash problem
    ws("bazel_wkspc_${env.EXECUTOR_NUMBER}") {
        stage("checkout") {
            checkout scm
        }
    }
}
a fast clone, a warm analysis cache, no races
We can make this a simple groovy function which takes an fn (a closure), clones the repository in correct locations and calls the closure. We can consider this our own equivalent to pipeline directive
def gitClean() {
    sh 'git clean -ffd'
}
def pipe(fn) {
    ws("bazel_wkspc_${env.EXECUTOR_NUMBER}") {
        // also fix the workspace cleanup problem
        try {
            stage("checkout") {
                checkout scm
                gitClean()
            }
            fn()
        } finally {
            gitClean()
        }
    }
}
Your developer team can now use this instead of the pipeline directive. This is pretty idiomatic groovy, very beautiful :)
node("mynode") {
    pipe {
        stage("fast-bazel-build") {
            sh "bazel build //services/A"
        }
    }
}
In terms of performance, this was the final missing piece. We have now reduced our setup times significantly
The Single Root Pipeline Problem
Until now, we have relied on bazel to do all the caching for us. What do we do when some action is not tracked by bazel? Like deployments?
The moment your monorepo ends up with more than one service, you start hitting limitations of the single pipeline setup. The same pipeline will package and deploy all the services in your monorepo.
The pipeline becomes large. Deployments of independent services are coupled. The pipeline progressively becomes slower. It’s simply doing too much.
This becomes an inhibitor for people to move to a microservice architecture. The popular saying Monorepos are not Monoliths becomes a myth.
I wanted to move my X-Ray inference service from our main backend at qure.ai. The single pipeline setup was a major blocker for this.
Monorepo: A collection of small repos
The idea seems simple. When we started working on our monorepo, I just took this for granted.
It’s important however, to take a step back and understand what a repository is. A few properties of a generic repository:
- has source code
- has an independent pipeline
- has some concept of deployment (a library is deployed/published to a registry, an application is deployed to servers)
- unique linting and formatting rules
- unique intellisense configuration
Think carefully about these properties (there might be more). Do all your bazel packages have these properties? If they don’t then you are restricting yourself by using a monorepo.
It’s okay if you decide you want to fix some properties for all your repos (like linting rules). The point here is that you should have the power to restrict, it should not be forced upon you.
When your monorepo becomes flexible enough to support this ideology, many open-source tools start working as they are supposed to (remember, a lot of developer tooling out there is made for multi-repo setups). This is the last step in actually unlocking the power of a monorepo.
Our current setup, single root pipelines, is very restrictive.
A pipeline for every package
We have established that we need a pipeline for every bazel package in the repository. The repository looks like this.
.
├── Jenkinsfile
├── WORKSPACE
├── libs
│   ├── L1
│   │   ├── BUILD
│   │   └── Jenkinsfile
│   └── L2
│       ├── BUILD
│       └── Jenkinsfile
└── services
    ├── A
    │   ├── BUILD
    │   └── Jenkinsfile
    └── B
        ├── BUILD
        └── Jenkinsfile
The strategy
Whenever you do a git push in a repository (which is part of a multi-repository setup), conventionally a pipeline is automatically started.
In other words, a pipeline is triggered whenever something changes in your repository.
We’ll use the same strategy for our setup.
Given a git changeset, trigger the pipelines of all the packages which were affected by the change.
A change in a single package should trigger it’s own pipeline, and the pipelines of all other packages which depend on it (including transitive dependencies).
We will use bazel’s querying capabilities to find the set of packages affected by a change.
Implementing the dispatcher
So the algorithm for finding out which pipelines to build is simple:
- Find all the changed files from git
- For PR builds, you can get this by diffing against the base branch of the PR
- For long running branches, you need a way to get the diff from your CI
- Given all files in the diff, fetch the Bazel packages they belong to
- Given the set of changed bazel packages, find the set of packages which depend on these packages
- Given the set of affected packages, find the pipelines to trigger
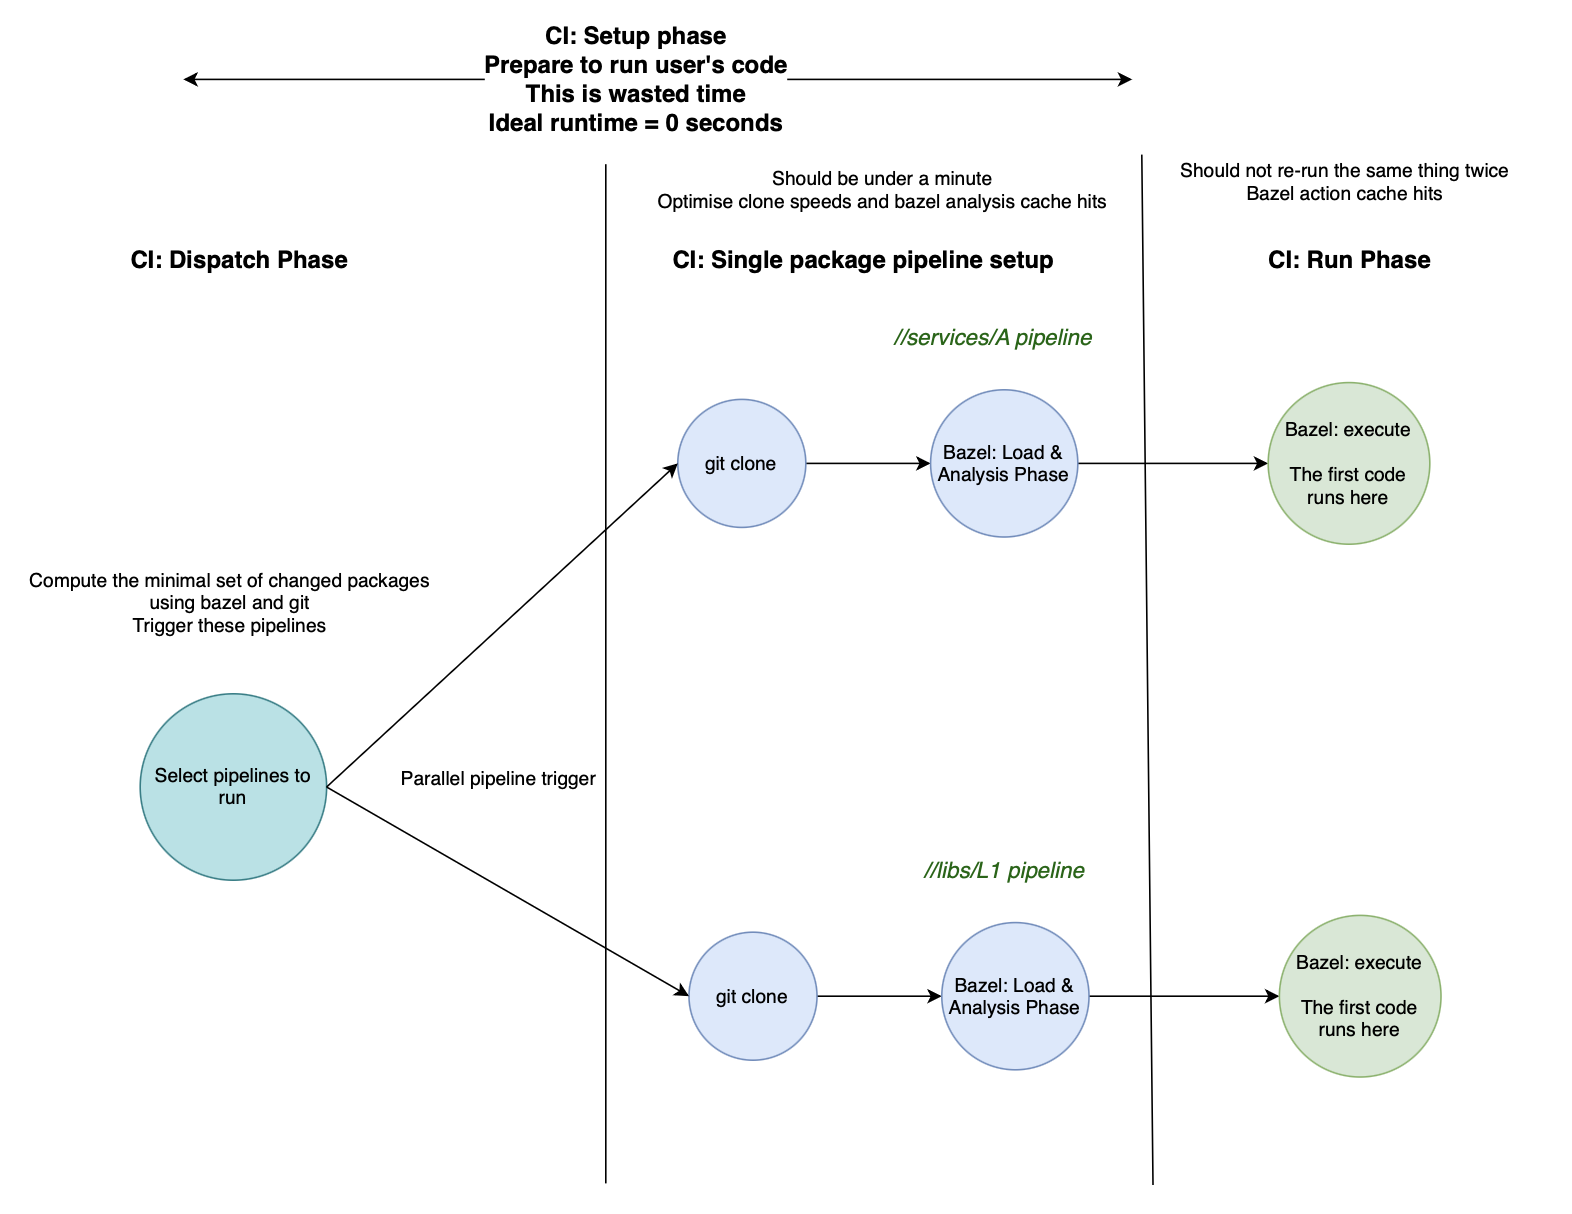
The root pipeline in your repository will now do this. It’s sole responsibility is to schedule the minimal set of pipelines for a given changeset. I call this the dispatcher.
This is going to be a dense Jenkins specific implementation.
Getting the git changeset
For a given multi-branch pipeline, you can use the following groovy snippet to get all changes in the branch’s pipeline.
// reference: https://stackoverflow.com/questions/38084806/how-to-get-the-changes-since-the-last-successful-build-in-jenkins-pipeline
@NonCPS
def getChangedFiles(scmVars) {
    /**
        When running in a pipeline,
        get all the builds until the last successful builds
        Get the changeset of each build.
        Union of all changesets is
        the set of changed files that we want to build for
    */
    def builds = getBuildsSinceLastSuccess()
    def changedFiles = []
    for (build in builds) {
        for (changeLogSet in build.getChangeSets()) {
            for (entry in changeLogSet.getItems()) {
                for (file in entry.getAffectedFiles()) {
                    changedFiles.add(file.getPath())
                }
            }
        }
    }
    return changedFiles
}

@NonCPS
def getBuildsSinceLastSuccess() {
    def build = currentBuild
    def result = []
    while ((build != null) && (build.result != 'SUCCESS')) {
        result.add(build)
        build = build.previousBuild
    }
    def buildNumbers = result.collect { it.number }
    println "builds used for diff: ${buildNumbers}"
    return result
}
There is one big limitation of this approach though:
- the changeset of the first build for a branch’s pipeline is empty (this is a Jenkins limitation)
This implementation therefore, only works for long running branches. The strategy we use is to first force the builds of all downstream pipelines whenever we make a new branch. After that is successful, the algorithm to find the changeset from the last successful build is correct.
This does not work for feature branches. I have failed in getting the changeset reliably for feature branches from Jenkins after significant efforts.
Instead of pipelines tracking and building feature branches, we have pipelines which track a Pull Request. We completely ignore feature branches now.
You can enable Pull Request Support for your Multi-branch pipelines using this reference.
For PR builds
This is reasonably straightforward, we have access to the base branch of this PR in the variable env.CHANGE_TARGET. Simply get the diff using plain old git.
// scmVars is the output of checkout scm command, you'll need to pass it around (define it globally if you want)
// scmVars = checkout scm
def currentCommit = scmVars.GIT_COMMIT
def rawChanges = sh(
    script: "git diff-tree --no-commit-id --name-only -r origin/${env.CHANGE_TARGET} ${currentCommit}",
    returnStdout: true
).trim()
def changes = rawChanges.tokenize('\n')
return changes
You need to use the combination of PR changeset and long-lived Branch changeset in your setup.
Now changes is a list of strings, each string is a filename from the git changeset.
Bazel query: find the whole changeset
Now that we have a changeset, we need to get all bazel packages these changesets belong to. As an example, if services/A/src/A/main.py is a changed file, the affected bazel package is services/A. This can easily be done by finding the closest ancestor containing a BUILD file for a given path.
With the set of all bazel packages which have changed in the changeset, we need to find all the packages affected by these packages. Bazel calls this Reverse Dependencies.
bazel query --noimplicit_deps \
    "rdeps(//..., '//services/A:*')" \
    --order_output full \
    --output label
The snippet "rdeps(//..., '//services/A:*')" means that we want to find all the reverse dependencies of all targets of package //services/A (//services/A:*) in the whole monorepo (//...).
Trigger downstream pipelines
Any multi-branch pipeline in Jenkins first needs to be created in the UI manually, where we specify the location of the Jenkinsfile.
We want to do the reverse operation here, given a Jenkinsfile location, we want to find the corresponding Jenkins pipeline.
This is a difficult problem to solve generically.
Instead, let’s follow a convention. All pipelines would be inside the folder monorepo in Jenkins. The structure of this folder EXACTLY mirrors the structure of your actual monorepo.
So now our Jenkins looks like this in the UI
.
├── pipe__on_commit (multi-branch pipeline for /Jenkinsfile, the dispatcher)
├── libs
│   ├── L1
│   │   └── pipe__on_commit (multi-branch pipeline for /libs/L1/Jenkinsfile)
│   └── L2
│       └── pipe__on_commit (multi-branch pipeline for /libs/L2/Jenkinsfile)
└── services
    ├── A
    │   └── pipe__on_commit (multi-branch pipeline for /services/A/Jenkinsfile)
    └── B
        └── pipe__on_commit (multi-branch pipeline for /services/B/Jenkinsfile)
For every Jenkinsfile location, we create a multi-branch pipeline called pipe__on_commit.
Now its pretty simple to get the pipeline name from a given bazel package.
// example path
def bazelPackagePath = "services/A"
// get the pipeline name
def pipelineName = "monorepo/${bazelPackageRelPath}/pipe__on_commit"

build job: pipelineName
You should trigger all pipelines in parallel in the dispatcher.
Wrapping up
Phew! This was a big article. Thanks for sticking out until the end.
We now have a single-repo multi-pipeline CI setup which selectively dispatches the minimal pipelines needed to build packages in your monorepo for a given introduced change.
This is what our architecture looks like now:
Appendix: Simple git speedup tricks
There are some standard tricks to speeding up git clones. I’m just putting it out here briefly, the real speedup comes in the Analysis Cache section
- Using reference repositories. Check this article out. You should definitely setup your pipelines to use this
- The basic idea is to pre-clone the repository separately in your agents, and ask pipelines to use that directory as a cache
- If you use git-lfs, set a pre-configured location for LFS assets for all repositories using
git config --global lfs.storage=/var/lib/jenkins/lfsfor your agent (I’m not aware of any thread-safety issues here, we have not experienced problems with this until now) - Partial and shallow clones: These are useful for ephemeral agents, but I don’t recommend using this for permanent agents (more on this later)
These easy steps can help solve your git clone problems (it did not for us, I could bring down the clone time to 4 minutes, but even this is not ideal [the issue is how frequent this operation is, every pipeline waits 4 minutes to clone. For a CI user, that is wasted time])